Tuesday, February 17, 2009

Adding a vignette to photographs

Digital cameras have greatly advanced even an amateur photographer's ability to capture sharply focused images - sometimes too sharply focused. Back in the days when film photography was the only game in town, there were a lot of camera lenses that couldn't focus across the entire area of the film, leaving photos dark and a bit blurry at the edges and corners. Sometimes a lot dark and blurry.

For those times when you want to subtly age your photos or even emphasize a certain part of the picture, you can simply add a vignette via a photo editing program like Adobe Photoshop Elements, which retails for around $80.

To create a vignette, use the Elliptical Marquee Tool to select nearly the entire photo. Feather the selection (240 pixels on a 10 megapixel image works well, use less feathering for smaller images), then invert the selection. Go to Enhance/Adjust Lighting/Levels and slide the right Output Level slider to the left, which will darken the edges of the photo slightly. You can then add some soft blur (Filter/Blur/Gaussian Blur) to your liking.

Photos © 2009 James Jordan.

Labels: ,

Monday, January 12, 2009

Recapturing lost details in a photo via layers in Photoshop

I love old barns. It was a photographic treat to have one at my disposal at a local forest preserve.

The two photos above show what a little effort in Photoshop Elements can do for your pictures. The bottom photo is what came out of my camera. The contrast between the stone wall, red barn and white snow resulted in a pretty good picture. But are we satisfied with pretty good when we can have fabulous? No!

For one thing, the details in the foreground snow are lost. To get them back, I copied the photo and pasted it as a layer over the original. I then inverted the layer (Select All/Filter/Adjustments/Invert), which created a negative image. Then I selected Soft Light in the Layers dialog box. Hello, snowy details! I played with the Opacity setting slider until I was satisfied with the look - I wound up at just above 50% opacity.

While that action rescued the snow, it played havoc with the barn and stone wall, so I selected the barn and stone wall with the Polygonal Lasso Tool, added an 8-pixel feather and deleted them from the layer, exposing the barn and fence from the background layer below. I then flattened the image, cranked up the color saturation about 15% and applied an Unsharp Mask at 200%, 1.0 Pixel and 0 Threshold.

I then added a faint vignette - I used the Elliptical Marquee Tool to select nearly the entire photo. Feathered the selection at 240 pixels, then inverted the selection. Went to Enhance/Adjust Lighting/Levels and slid the right Output Level slider to 220, which darkened the edges of the photo slightly. I then added some soft blur (Filter/Blur/Gaussian Blur at 8.0 pixels).

The inverted layer/Soft Light combo is a great way to recapture details that might have gotten lost in the shadows and highlights of your pictures.

Photographs © 2009 James Jordan.

Labels: ,

Friday, January 9, 2009

A word about Unsharp Mask

When it comes to digital photo editing, your best friend in the world will be the Unsharp Mask feature. Why? Because the Unsharp Mask will make your pictures sharper.

It sounds oxymoronic, but the term originated back in the early days of darkrooms and film. Someone figured out that if a negative was not quite in focus, it could be fixed to an extent by producing a slightly blurred negative of the original negative then sandwiching it with the original. The unsharp image masked some of the blur in the original negative when a print was made from the pair. This setup added contrast to the edges of the tones of the photo, giving the appearance of increased sharpness. Don’t ask me how it works. It just does. Anyway, the blurred duplicate became known as an unsharp mask. That’s all I’ll say about that.

The Unsharp Mask feature of Photoshop, et al, does basically the same thing as its filmy counterpart. It increases the contrast at the edges of a photo’s tones, giving the appearance of more sharpness. (Note: If your photo editing program only has a Sharpen feature, it's really an Unsharp Mask - it's just pre-set and cannot be adjusted.)

Your Unsharp Mask dialog box comes equipped with three variables, Amount, Radius and Threshold.

Amount is listed as a percentage, and controls how much contrast is added at the edges of tones.

Radius affects the size of the edges to be enhanced. Fine detail needs a smaller Radius. Radius and Amount interact; reducing one allows more of the other.

Threshold controls how far apart adjacent tonal values have to be before the filter does anything. This lack of action is important to prevent smooth areas from becoming speckled. Low values should sharpen more because fewer areas are excluded. Higher threshold values exclude areas of lower contrast. Sliding the Threshold setting all the way to 255 cancels all sharpening.

I nearly always run my photos through an Unsharp Mask. My default setting on Unsharp Mask is Amount 100, Radius 1.0 and Threshold 0. Depending on the photo, I’ve cranked the amount as high as 500. Since most of my photos have some fine detail, I rarely move the Radius setting. I increase the Threshold if I’m sharpening a portrait or a picture with large areas of even tones.

Open a photo and play with the Unsharp Mask settings to find a combination that works for you.

Photograph © 2008 James Jordan.

Labels: ,

Thursday, January 8, 2009

Do some layering to make your pictures pop

Back in the days when digital photo editing was in its infancy, there were a lot of choices when it came down to which software to use. Each one did pretty much the same things as the others, albeit with different names and menus. Then Adobe did something with its Photoshop software that changed the game. It added the ability to work with layers, and set itself apart from the crowd.

Getting the most out of Photoshop or Photoshop Elements or any photo editing program requires some facility with the programs' Layers options. I've posted a Photoshop Elements tutorial on my photo blog that shows what is possible when using layers and combining them with various effects and filters, using the two photos above as samples. I'll cross post most of those tutorials here, but for today, slide on over to Points of Light to see the first in the series.

Click on picture to enlarge. Photograph © 2009 James Jordan.

Labels: ,

Saturday, February 24, 2007

Troubleshooting: From Okay to 'Oh, wow!'


Portland Head Light 2
Originally uploaded by zen granny.
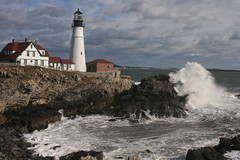
Flickr has a number of groups where people can post their photos to get advice and ratings on a scale from one to five or one to ten. I found this photo of the lighthouse at Portland Head, Maine, posted in one of those groups.

This photo has a number of things going for it. It is nicely composed, with the lighthouse sitting on a diagonal line from the top left to bottom right of the photo. The photographer timed the shot just as a large wave broke against the foreground rocks, adding drama to the scene, and the sky is very interesting with the receding clouds providing a feeling of depth.

But it also has some problems. The photo is underexposed, muting all of the colors that I know are present in the scene, having photographed at that very location myself. The dramatic clouds are nearly lost in a blue-gray mush of sky. Plus, the horizon line is noticeably crooked.
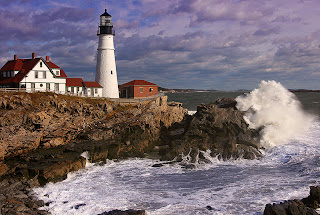
Looks like a job for PhotoShop!

There are those who feel that editing a photo on a computer is somehow cheating, but I don’t hold that view. In this case, the limitations of digital cameras had locked the scene within the confines of an okay photo. But I wanted to liberate the photo into an “Oh, wow!” image. The image information is there in the digital file, it just needed some adjustments to bring it out.

The first thing to do was to correct the horizon. In “Image/Rotate Canvas” I rotated the image 1.5 degrees counter clockwise, then cropped the photo.

Next, I compressed the high and low tones of the photo. This was done in the “Adjust levels” dialog box. I simply slid the left and right sliders toward the middle of the histogram. That brought the contrast back to an acceptable level and made the white tower snap out from the background. A good start. Next, I adjusted the Color balance by adding some red and a slight bit of yellow to warm up the photo, which appeared to be taken around mid morning in bright sunlight. I pumped up the color saturation by about 15 percent to bring out the colors of the outbuildings and sky.

I then selected the sky and foreground water with the rectangular lasso and polygon selector respectively, feathered the edges about 12 pixels, then adjusted the color balance of those areas toward blue. I then selected the darker foreground rocks with the polygon tool, feathered the edges slightly, the adjusted the levels on the selected area to brighten the rocks a tad. Some unsharp masking rounded out the session, which took me all of about ten minutes.

Get to know a photo editing program and play around a bit with some of your photos. As you can see, just a few simple adjustments can make a photo go from so-so to stunning.

Labels: , ,

Thursday, February 15, 2007

An introduction to Orton

The Orton method is a way to produce soft-focus photos with saturated colors. The two photos at the right show a normal photo and the same photo with the Orton effect applied.

In the days before computers, the effect was achieved photographically by sandwiching two slide transparencies – one that was overexposed by two stops, and one of the identical scene overexposed by two shops and with the focus thrown off. The same effect can be achieved in a photo editing program that supports layers, such as PhotoShop.

Here’s how to do it:

*Open your image in PhotoShop.
*Go to "Image", then click "Apply Image".
*Set the blending to "Screen", and your opacity to 100%. Click OK.
*Go again to "Image", down to "Duplicate".
*With the image you have just duplicated, go to "Filter", down to "Blur-Gaussian Blur".
*Set the blur anywhere from 20 to 50. Click OK.
*Grab the blurred image with the “Move” tool, hold down the Shift key and drag it on top of your first image.

*Go to "Windows", then down to "Layers".
*Set the blending mode from "Normal" to "Multiply".

You can now adjust the opacity of the top layer and make adjustments to lightness levels and color saturation on either of the two layers. When you are satisfied with the results, select “Flatten image” in the Layers dialog box, then Save your image (or “Save As” if you’d like to retain your original).

Not all photos take well to the Orton method, so experiment and see what happens.

Click on photos to enlarge. Photographs © 2007 James Jordan.

Labels: , ,