HDR, or high dynamic range photography, is a process that combines several exposures of a scene into one image. It allows a photographer to capture a wider range of tones than would have been possible with just a single exposure. It also requires software that I don't have. I do have Photoshop Elements 6, which retails from $80-100, which is more suited to my budget. I conducted a little experiment to see if it was possible to create a pseudo-HDR with the software and wound up quite pleased with the results.
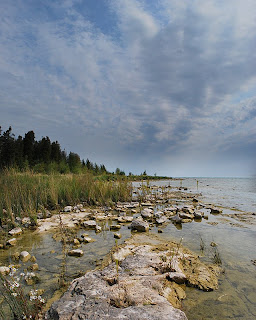
As many times as I’ve visited the Toft Point natural area in Door County, Wisconsin, I have never quite gotten a photograph that I thought adequately depicted the rugged, wild nature of the place. I arrived there one more time last month on a day of clouds and spotty sunshine. I noticed an interesting cloud formation to the north and decided to try to capture it against the rocky shore. I camped on a rock surrounded by water, set my tripod low and set my zoom lens to its widest angle. From that position, I took two shots – one of the sky and one of the lakeshore, setting an ideal exposure for each and intending to merge them together later.

I was disappointed with the initial result, which I have bravely posted here. I let it sit for a couple of weeks, then decided to throw everything I had at it to see if I could spice up the image.
In Photoshop Elements 6, I selected the lakeshore and applied an Orton effect – I lightened the image selection by about half, copied it and pasted it over itself on a layer. I put a slight Gaussian blur on the layer, then blended it with the layer beneath using “multiply.” This boosted the color saturation of the rocks and water. I did a similar adjustment to the sky, except this time I converted the adjustment layer to grayscale and cranked the contrast wayyyyy up. I added a slight Gaussian blur then blended the layers using “Soft Light.” The action popped the clouds but added a bit of noise to the sky, which I corrected with Elements’ noise filter. I added a slight vignette to the overall image to finish things up.
Images © 2008 James Jordan.Labels: Post-processing
 As I look at some of my favorite photos of children, I've noticed some similarities among the images. I nearly always try to get up close to the subject and just sit and watch with a camera in hand until the child no longer cares that I'm around, then I'll begin taking pictures. I almost never use a flash, and when I do, I bounce it off the ceiling. If you don't have a flash unit that can adjust direction, tape a piece of wax paper over the front - it will soften the light and reduce harsh shadows.
